
Last Updated on September 6, 2025

The OBD2 (On-Board Diagnostics II) system has been standard in cars since 1996. It helps drivers and mechanics diagnose engine performance, emissions, and electrical issues. By connecting an OBD2 scanner to the Data Link Connector (DLC), you can quickly identify trouble codes stored in the car’s ECU.
However, sometimes you may face the frustrating situation where your OBD2 scanner won’t turn on. In most cases, this is caused by a blown fuse that prevents the port from supplying power to the device.
Key points to know:
- OBD2 System Role: Continuously monitors sensors, records error codes, and alerts you when something goes wrong.
- Scanner Power Source: The OBD2 port gets its power from the car’s fuse system (often the same one that powers the cigarette lighter/12V outlet).
- Common Problem: If the fuse is blown, the OBD2 port cannot power the scanner.
- Other Possible Causes: Low battery, damaged wiring, or a faulty scanner cable.
In this guide, we’ll walk through everything you need to know about fixing an OBD2 scanner not turning on—from locating the fuse to testing and replacing it safely.
What Is the OBD2 Fuse and Why Does It Matter?
The OBD2 fuse is a small but essential component that supplies power to your vehicle’s diagnostic port. Without it, the OBD2 scanner cannot communicate with the car’s ECU, leaving you unable to diagnose or clear trouble codes.
When this fuse blows, the scanner won’t power on even if it is fully functional. This makes the OBD2 fuse the first thing to check whenever your scanner doesn’t turn on.
Why the OBD2 fuse is important:
- Provides power to the OBD2 port (usually 12V).
- Ensures proper communication between the scanner and ECU.
- Prevents damage by cutting off current in case of short circuits or overloads.
Common reasons the OBD2 fuse blows:
- Electrical overloads (too many accessories using the same circuit).
- Short circuits in wiring connected to the port.
- Using faulty chargers in the cigarette lighter or 12V outlet (which often shares the same fuse).
- Normal wear and tear over time.
👉 In many vehicles, the OBD2 fuse is linked to the cigarette lighter or accessory outlet fuse. So, if both the lighter socket and the scanner stop working, it’s almost always a blown fuse issue.
OBD2 Fuse Location
Finding the OBD2 fuse is a crucial step when your scanner refuses to turn on. Unlike some components that have a fixed position across all cars, the OBD2 fuse does not have a universal location. Its placement can vary depending on the make, model, and even year of your vehicle. That’s why consulting your owner’s manual is always the best starting point before diving into the fuse box.
In most vehicles, you will usually find the fuse inside one of three areas. The first and most common location is underneath the dashboard, close to the steering wheel. This area often contains the interior fuse box that protects circuits related to the OBD2 port, radio, lights, and other accessories. Because the OBD2 port itself is almost always located under the dashboard, the fuse that powers it is typically positioned nearby for easy access.
Another frequent location is inside the engine compartment, usually within a large fuse box covered by a plastic lid. This box protects the high-demand electrical components, such as the cooling fan, ABS system, ignition, and in some cases, the OBD2 circuit. While less convenient than the dashboard location, it is still relatively simple to reach once you open the hood.
In certain vehicles—especially some luxury models—you may also find an additional fuse box in the trunk. While not as common, manufacturers sometimes distribute fuses across different compartments to reduce wiring complexity. If your dashboard and engine compartment checks don’t reveal the OBD2 fuse, the trunk is worth examining.
Once you have located the correct fuse box, identifying the OBD2 fuse itself becomes the next challenge. Automakers usually label the fuses with abbreviations such as “OBD,” “DLC,” “CIG,” or “ACC.” These stand for On-Board Diagnostics, Data Link Connector, Cigarette Lighter, and Accessory Power. Since the OBD2 port often shares its circuit with the lighter socket or 12-volt accessory outlet, spotting one of these labels in the diagram almost always leads you to the right fuse.
Because of this shared connection, a quick way to suspect a blown OBD2 fuse is when both your cigarette lighter or power socket and your scanner stop working at the same time. This overlap helps narrow down the search and saves time. Once you know where the fuse is located, you can proceed with inspection and testing to confirm whether it is the true cause of your OBD2 scanner not turning on.
How to Examine and Test an OBD2 Fuse
After locating the OBD2 fuse, the next step is to check whether it has actually blown. A fuse may look intact from the outside, but only proper inspection and testing can confirm its condition. Examining the OBD2 fuse is not complicated, but it does require some patience and the right tools.
The process begins with ensuring the vehicle is turned off. Always switch off the ignition before touching any fuse, as this prevents accidental shorts and protects you from electric shocks. Once the car is off, carefully open the fuse box cover. Most vehicles include a small diagram inside the cover that maps out the position and function of each fuse. Use this as your reference to pinpoint the fuse linked to the OBD2 port or accessory outlet.

With the correct fuse identified, the next step is visual inspection. Gently pull out the fuse using a fuse puller or a pair of needle-nose pliers. Look through the transparent casing: a healthy fuse will have an unbroken metal strip, while a blown fuse will show a melted or broken filament. In many cases, this simple check is enough to confirm the problem. However, some fuses may look intact yet still be faulty, which is why further testing is necessary.
To perform an accurate test, you will need a digital voltmeter or multimeter. Set the multimeter to continuity mode or resistance mode, then touch the probes to the two metal prongs of the fuse. If the multimeter shows continuity (a beep or a reading close to zero ohms), the fuse is good. If there is no reading or infinite resistance, the fuse has blown and needs to be replaced. Another way to test is by checking voltage at the OBD2 port itself: place the black probe on pin 4 (ground) and the red probe on pin 16 (power). If no voltage is detected, the fuse or related wiring is the likely culprit.
It is also important to examine the surrounding wiring and the OBD2 connector. Loose, bent, or corroded pins can prevent proper contact between the scanner and the port. Pay special attention to the area under the dashboard, as this section of wiring is often exposed to movement, moisture, and wear. A visual check for frayed wires, burnt smells, or damaged insulation can reveal additional issues that may contribute to power failure.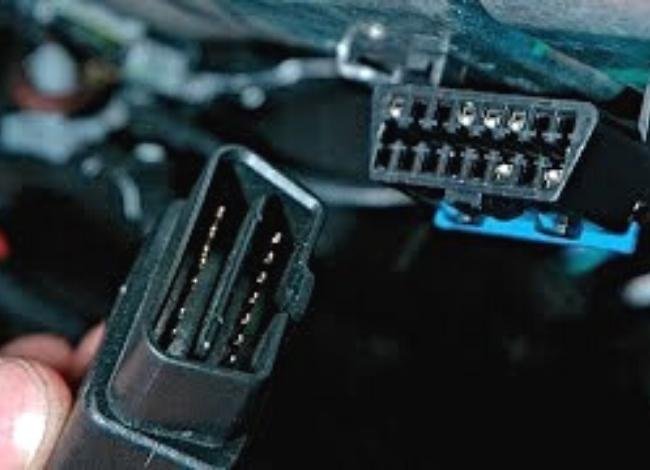
By carefully inspecting and testing the fuse, you can confirm whether it is the source of your OBD2 scanner power issue. If the fuse is intact but power is still not reaching the scanner, the problem may lie deeper in the wiring or the car’s electrical system, requiring professional diagnosis. However, in most cases, a simple blown fuse is the main reason why an OBD2 scanner won’t turn on.
How to Repair or Replace an OBD2 Blown Fuse
Once you have confirmed that the OBD2 fuse is blown, the repair process is straightforward. The fuse itself is inexpensive and easy to replace, making this one of the simplest car repairs you can do at home. Still, it is important to follow the steps carefully to avoid damaging the electrical system or installing the wrong component.
The first step is to ensure the vehicle is turned off and the key is removed from the ignition. Electrical systems can be sensitive, and working with live circuits may cause further damage. After powering down, open the fuse box and carefully remove the faulty fuse. You can use a fuse puller, which is sometimes stored inside the fuse box cover, or a small pair of pliers if necessary. Be gentle to avoid cracking the plastic housing of the fuse or damaging the slot.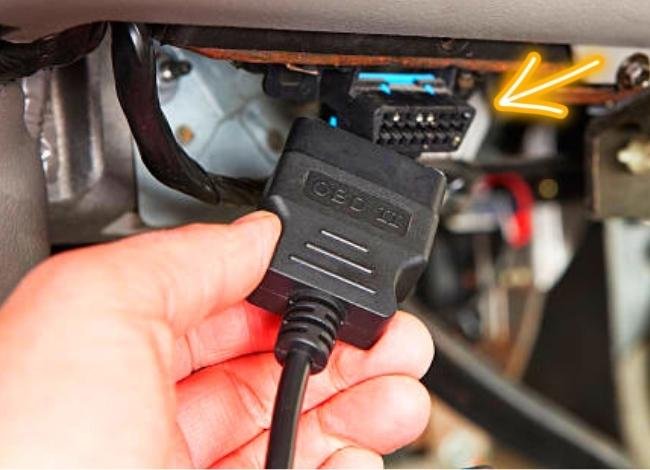
Before installing a new fuse, check the amperage rating. Every fuse is designed to handle a specific current load, usually indicated by a number printed on top (commonly 10A or 15A for OBD2 circuits). Always replace the blown fuse with another of the same rating. Installing a higher-rated fuse may prevent it from blowing again, but it can also cause serious damage to wiring and components if a short circuit occurs. On the other hand, a lower-rated fuse will blow too easily, disrupting the system unnecessarily.
Insert the replacement fuse into the slot firmly until it is seated properly. Once the new fuse is in place, close the fuse box cover and turn the ignition back on. Now plug your OBD2 scanner into the port and check if it powers up. In most cases, the scanner will turn on immediately, confirming that the issue has been resolved.
If the new fuse blows again shortly after replacement, this points to a deeper problem such as a short circuit, faulty wiring, or a damaged accessory connected to the same circuit. For example, because the OBD2 port often shares its fuse with the cigarette lighter or 12V power socket, a defective phone charger or accessory could repeatedly overload the circuit. In such cases, further inspection or professional help is recommended.
Another good practice is to visually inspect the fuse box and nearby wiring for any signs of overheating, cracks, or loose connections. Sometimes a fuse blows not because of an accessory but due to damaged insulation or moisture intrusion in the wiring harness. If you notice burnt smells, blackened connectors, or melted plastic, do not attempt to repair it yourself—have a qualified mechanic trace the problem.
Conclusion
If your OBD2 scanner is not turning on, the most common cause is a blown fuse. By locating the fuse, testing it with a multimeter, and replacing it with the correct rating, you can restore power to the diagnostic port in just a few minutes. In most cases, this simple repair solves the issue without the need for professional help.
Always remember to:
- Use the same amperage rating when replacing fuses.
- Inspect wiring and the OBD2 port for damage.
- Check related circuits such as the cigarette lighter/12V outlet, since they often share the same fuse.
Fixing the fuse not only gets your OBD2 scanner working again but also ensures your car’s diagnostic system remains reliable. By handling this issue early, you avoid misdiagnoses and keep your vehicle in top condition.
FAQs
1. Why won’t my OBD2 scanner turn on?
Your scanner may fail to power on due to a blown OBD2 fuse, a low or dead car battery, damaged wiring near the port, or a faulty scanner cable.
2. Can a blown fuse stop my OBD2 scanner from working?
Yes. If the fuse that powers the OBD2 port is blown, the port will not deliver electricity to the scanner, preventing it from turning on.
3. How do I check if the OBD2 port has power?
Use a multimeter. Connect the black probe to pin 4 (ground) and the red probe to pin 16 (power). A healthy port should read around 12 volts.
4. What should I do if my OBD2 scanner cable is damaged?
Replace the cable with a compatible replacement or contact the manufacturer for repair options. A faulty cable won’t transfer power or data correctly.
5. Can a weak car battery affect my OBD2 scanner?
Yes. If your battery is too low, the OBD2 port may not provide enough power for the scanner. Recharging or replacing the battery usually solves this.